

Arches & Canyonlands Travel Guide
An Extended Weekend Trip
Overview
Arches National Park: Sculpted by the elements, nature’s chisel of choice, the scenery looks permanent but is in a perpetual state of change. The park is relatively small, and the main road is only 36 miles round trip.
Canyonlands: A meticulous waltz between river and stone produce fissures running deep into Earth’s core. The park is enormous and as such, it is divided into three sections, Island in the Sky, The Needles, and The Maze. We only explored Island in the Sky & The Needles.
Hiking: We hiked 10 trails in 4 days, and summed up our experiences in the below chart. In terms of the “difficulty” rating, everything is more than doable, but proceed with caution on the 7’s-9’s if you have an aversion to heights, trouble with easy to moderate scrambling, or if you have issues walking long distances. Two main factors (permitting & crowds) determined when we hiked the trails. Permitting- You need a permit to hike Fiery Furnace (explained below). Our permit was for 11am on Day 2, so we structured the rest of the day around this hike. Crowds- Since Arches is relatively small & navigable, it can overflow with tourists. When hiking the more popular trails like Double Arch, Delicate Arch, and Devil’s Garden, avoid crowds by going early in the mornings, or on weekdays. Finally, we combined Druid Arch & Chesler Park Loop into one hike, which is explained below in further detail and can be seen on the site’s embedded map under the “Hike Highlights” section.

Hike Highlights
We hiked a total of 55 miles over the span of 4.5 days, and we’ve included additional information on each hike. At the bottom of this Hike Highlights section, there is an embedded map that illustrates everything in further detail. The map contains trailheads (color coded by day), stops & lookouts, physical arch locations, and hiking trails (with the exception of Fisher Towers & Fiery Furnace). The hike overviews are separated out by region (“Salt Lake City”, “Arches & Nearby”, and “Canyonlands”).
Salt Lake City

Ensign Peak: This short, but steep hike brings you to the peak that Brigham Young ascended to declare the valley fit for settlement. Your reward is a sweeping view of Salt Lake City. More detailed info can be found by visiting Ensign Peak on Visit Utah’s website.
Arches & Nearby
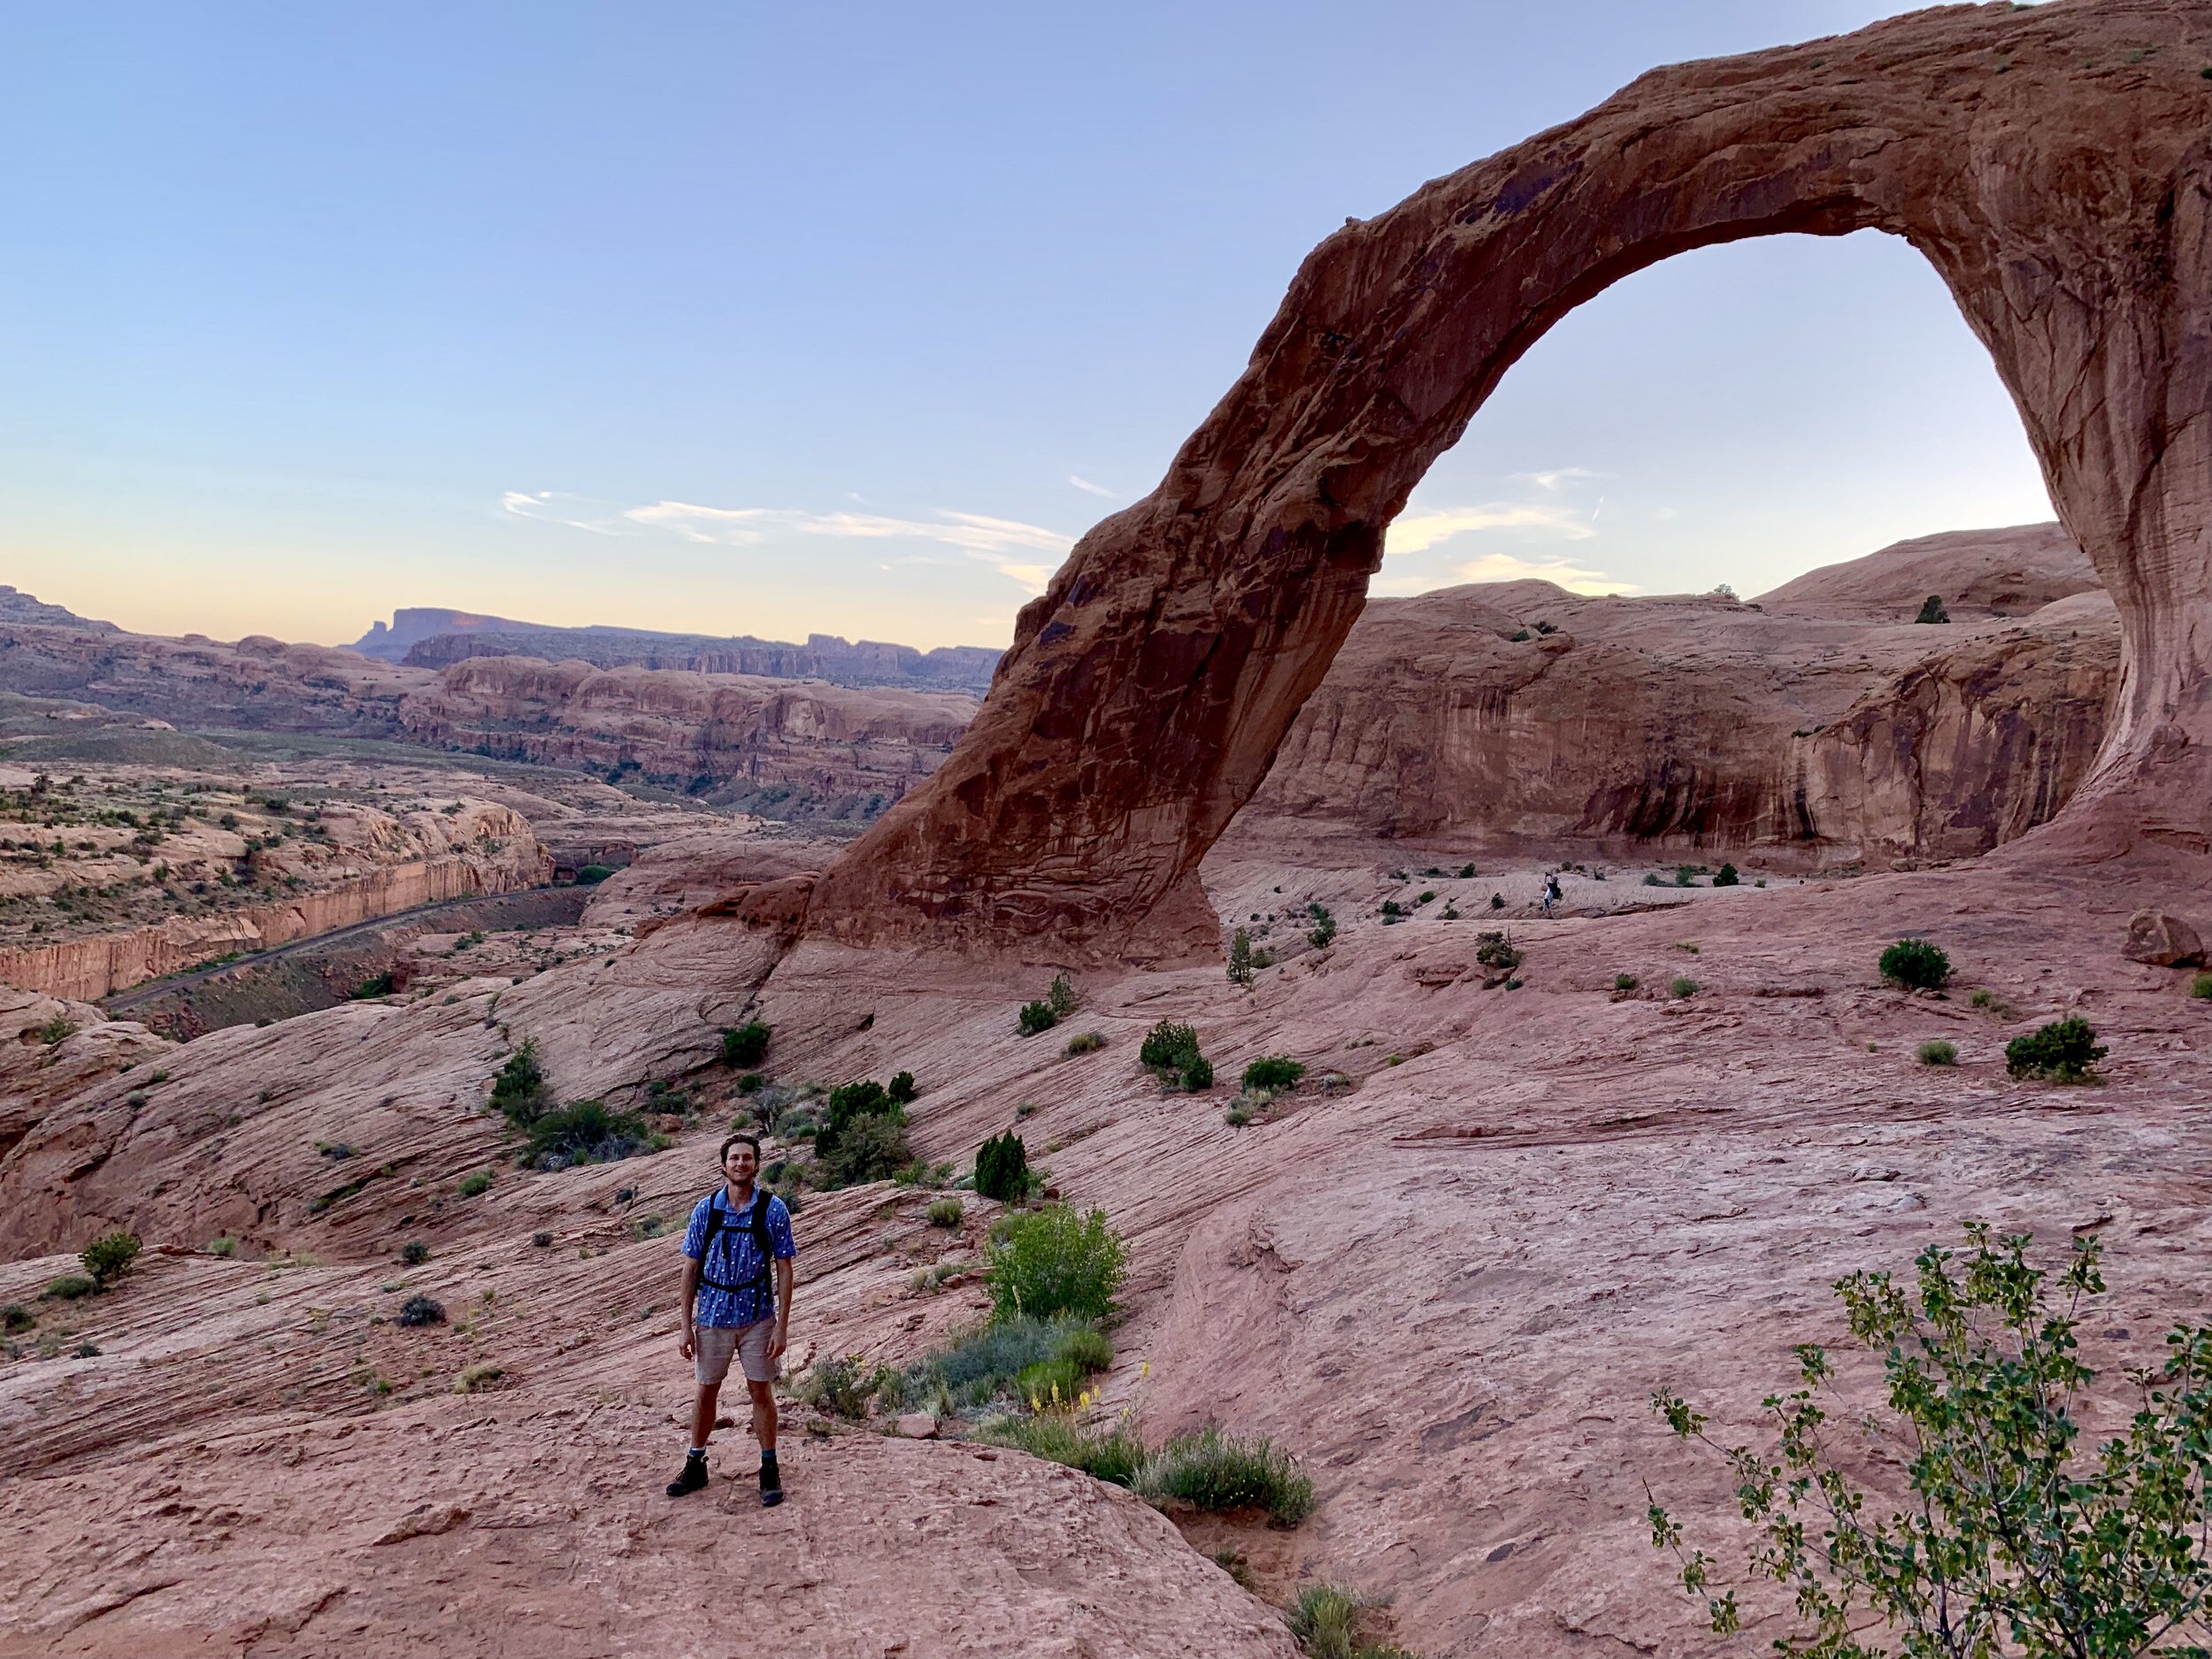
Corona Arch
Corona Arch: One of our favorite hikes, this short trail gives you a sense of the grandiose landscape. The sun was setting as we approached the arch, and we saw the most incredible colors reflect across the landscape. A little past Corona Arch is a massive drop-off. Peak down, and you’ll get the sense that you’re on the brim of an enormous bowl. As you approach Corona Arch, you’ll pass another massive arch called “Bowtie Arch.” This trail is just outside of Arches National Park, and is managed by the Bureau of Land Management. More detailed info & maps found by visiting Corona Arch on Utah’s website.

Fiery Furnace
Fiery Furnace: This trail remains so secluded, because the NPS only allows 75 people to visit per day! As a result, you need to first get a permit at Arch’s Visitor Center. Although you’re not guaranteed a permit, you should be able to get one if you arrive early in the morning. The official hike only takes approximately 2 hours but being in the fiery furnace is like being in a maze. There are tons of offshoots to explore, so give yourself enough time to (purposefully) get lost. More detailed info & maps found by visiting Fiery Furnace on the National Park Service website.

Fishers Tower
Fisher Towers: Awesome hike where you walk besides towering rock formations that dominate the sky and look reminiscent of an unstable drip sandcastles. The trail doesn’t have much cover from the sun, so make sure to bring extra water and sunscreen. This trail is just outside of Arches National Park, and is managed by the Bureau of Land Management. More detailed info can be found by visiting Fisher Towers on Visit Utah’s website.

Delicate Arch
Delicate Arch: This hike leads you to the park’s most recognizable arch. So familiar is Delicate Arch, that it’s the image on Utah’s state license plate. The hike is very exposed to the sun and overcrowded, so try going early in the morning. A few paces from the trailhead is Wolfe Ranch, an old log cabin with petroglyphs nearby. The hike itself doesn’t get scenic until you near delicate arch, but the payoff is worth it. More detailed info & maps found by visiting Delicate Arch on the National Park Service website.

Devil’s Garden
Devil’s Garden: This is a really fun hike with 7 different noteworthy arches, so keep on the lookout. Some parts of the trail are steep, but everything is manageable. More detailed info & maps found by visiting Devils’s Garden on the National Park Service website.

Jackson’s Trail
Jackson’s Trail: Easy Trail that follows the Colorado river. Great way to get a glimpse of the river carving through the valley. This was a last minute decision that paid off, and though we really enjoyed the hike, there are probably many others available with similar views. At one point, we had to cross a shallow, 8 foot stream, where one member of our group’s shoes got wet.

Double Arch
Double Arch / Windows Loop: Technically wouldn’t classify this as a hike, because these two notable trails are right off the park’s main road. Both trails start at the same trailhead and lead to massive arches, Double Arch & The Windows. More detailed info & maps found by visiting Double Arch on the National Park Service Website.
Canyonlands

Druid Arch Trail

Chesler Park Loop
Druid Arch & Chesler Park Loop: These two separate trails can be combined (which is how we hiked them) and are located in the park’s “The Needles” district. Lengthy hike, but totally worth it. Scenery changes drastically between gaping canyons, open pastures, and narrow slots. This was the most challenging hike of the trip, mainly because of the distance, but there were also short stretches of scrambling. I’d say the scrambling is very doable for all able body people, but you should evaluate distance beforehand. Druid Arch hike is a “down & back” hike that leads you to a massive arch. It’s the shorter of the two and can be done alone, if you only want to hike 9.5 miles. If you combine both, it will be approximately 17 miles which took us 10 hours at a moderate pace. We started at the trailhead, hiked to Druid Arch, cut over to Chesler Park loop by way of Joint Trail, then hiked clockwise around the loop back towards the trailhead. A map depicting our route is at the bottom of this page. Pack extra water- we drank between 5-7 Liters. More detailed info can be found by visiting Druid Arch & Chesler Park Loop at Grand Canyon Trust’s website.

Mesa Arch
Mesa Arch: this is a very short hike that leads you to a picturesque arch overlooking an indescribably large canyon in the “Island in the Sky” district. You’ve probably seen the arch in photos, and I’d highly recommend you take the hike. More detailed info can be found by visiting Mesa Arch on the National Park Service website.

Green=Hikes, Blue=Driving, Purple=Stops/Lookouts
Stops, Lookouts & Scenic Drives
These points are fun to look at, but don’t require too much meandering, and you can even see most of them from your car. Their locations have also been included as purple dots in the embedded map.
Arches & Nearby
Balanced Rock: Nature’s larger than life phallic sculpture
Moonflower Canyon: Sandy oasis between a somewhat narrow canyon. This area also has a few petroglyphs.
Potash Road Dinosaur Tracks & Petroglyphs: a 200+ yard trail that leads to petroglyphs and dinosaur fossilized footprints
La Sal Mountain Loop: Beautiful drive to the La Sal mountains which provide a birds-eye-view of Arches National Park

Balanced Rock

Potash Road Petroglyphs

La Sal Mountain Loop
Canyonlands & Nearby
Newspaper Rock: A massive wall covered in Petroglyphs
Green River & White Rim Overlook: Great lookout points to view Island in the Sky district

Newspaper Rock

Island in The Sky District Overlook
Quick Tips
Arches Visitor Center Hours: 7:30am-6pm MST (Apr. - Sept., Other Months Vary).
Canyonlands Visitor Center Hours: Check website. Each district has a separate visitor center.
Park Entrance Fee: $30 for Arches / $10 for Canyonlands (7-day vehicle pass, good for all members in the car).
Water: Drink responsibly. One Liter ever 1.5-2 hours of hiking should be fine. The visitor center has a water fueling station. It’s highly recommend you bring a camelback and a few additional water bottles. It’s better to have more water than not. We carry 3-7 liters depending on the hike.
Hiking Food: Before morning departure, everyone grabs enough food to satisfy them on the trails. The main sustenance is usually two sandwiches: Turkey/Salami & PB&J. We’re also big believers in the power of snacking. We average between 6-10 munches a day. Anything edible makes for a good snack, and some of our favorites include bars (Cliff, RX, Granola, Nature Valley), carrots, nuts, dates, oranges, animal crackers, pop tarts, and peanut butter crackers. Our friend once brought Indian veggie snacks called Bakarwadi, which were incredible.
Dining: We cooked all meals (except one McDonalds late night dinner). Breakfast is usually eggs & oatmeal. Dinner varies on what we buy at the grocery store, but we try to eat a lot of protein and carbs. We eat dinner whenever we return to home base, which can get pretty late. If we had another day in Moab, we would have tried Milt’s Stop & Eat burgers. Looked incredible.
Clothing: You’re going to be active and sweaty, so wear appropriate clothing. Depending on the time of year & time of day, weather can vary drastically, so always check the forecast. Even if it’s supposed to be warm, pack a jacket and long pants because it can be chilly in the mornings and after sunset.
Lodging: We stayed at Red Sands Habitation. No frills lodging with full kitchen at an affordable rate. About 15 minutes from Arches Visitor Center.
Souvenirs: Knickknacks can be purchased at the Visitor Centers. If you have 10 minutes to spare, we recommend visiting the Moab Rock Shop. It’s on the main road from Moab to Arches, and they have a few interesting oddities & fossils.
Gear: No technical gear necessary for any of these trails or hikes (though people who struggle with balance might benefit from using hiking poles as they help through uneven terrain).
Sunscreen: Don’t forget it.
Grocery Shopping: In an effort to maximize hiking time, we bought groceries at a Walmart before leaving Salt Lake City.
Sunset/Daylight: Always know what time the sun sets. You don’t want to be stuck hiking through the dark, so plan to leave yourself with enough daylight to safely return to your car.
Say Hi: The best part of hiking is meeting eclectic nature enthusiasts. At Moonflower Canyon, we found ourselves in the middle of a “witches convention” with 30+ girls. Apparently, clothing was optional!
Enjoy the adventure!
If there’s something we didn’t touch on, feel free to reach out.


